Beginner's guide to setting up an AngularJS project
AngularJS is a great framework, which I’ve had the opportunity to use on many projects. Having two way data binding between your UI and your javascript objects is a really great feature that I find myself missing when I’m not using Angular. Here, I’ll attempt to go through the steps required to get up and running with your first Angular application.
Note: The following article targets angular 1.x. This example is incompatible with Angular 2.
The first step of using any javascript library is, of course, to first download it, put it in a directory within your project, and reference it from your markup. For simplicity, I will reference the script from a CDN.
<script src="https://ajax.googleapis.com/ajax/libs/angularjs/1.3.14/angular.min.js" type="text/javascript"></script>
Ok great, we have angular referenced from our project, but now how do we use it? The first step that I typically take is to create a script which will act as the main entry point into my application. I typically name this file App.js, but you’re free to name it whatever you like.
Creating the App Module
Inside of App.js, we we first need to create a variable which will give us a reference to angular. Once this file is created, add the following line.
(function() {
    'use strict';
     var app = angular.module("MyAngularApp", []);
}());
Because we included angular, there should be an object named angular on the window object which is accessible. What we’re effectively doing here is creating a variable which houses a reference to an angular module. We won’t dig too much into modules, but just know that your angular application will be linked to this module that we have just created. In fact, if you’re just beginning, it may make more sense if you name this variable “app”, as it will basically just be referring to your application.
Also, note that the 2nd parameter of the module function takes an empty array. Be sure to include this empty array parameter, as there is also an overload, which takes a single string parameter, that will allow you to “get” a reference of your module rather than create one.
Creating our first controller
Now that we have a variable for our angular app, we need to create a controller, then attach it to our app variable.
var mainCtrl = function($scope) {

}

app.controller("MainCtrl", mainCtrl);
Our controller now has a reference (mainCtrl) and we have added it to our app with the controller method on our app module. The second parameter, “MainCtrl”, is the string to which we can refer to our controller if we need it in the future. You’re also probably wondering what this $scope parameter is on our controller. $scope is a built in angular service, which can be injected into any controller simply by adding it to that controllers constructor. Later, we will use the scope as a means to take advantage of two way data binding between our javascript and UI.
Referencing Angular from the UI
Now that we have our App.js script set up in our project, we need to add a reference to it inside of our UI markup. Go ahead and add the App.js script to your HTML, ensuring that it loads after angular has loaded.
In addition to adding the script reference, we’re going to add a couple of angular directives close to where we are currently working, on our opening html tag. Here, we’ll add the ng-app and ng-controller directives, which will notify angular which app and controller to use. Afterwards, we should have something resembling this.
<html ng-app="MyAngularApp" ng-controller="MainCtrl">
<head>
    <!-- Alter the paths so that they reflect where your scripts are. -->
    <script src="~/Scripts/angular.min.js"></script>
    <script src="~/Scripts/Angular/App.js"></script>
</head>
So what exactly have we done here? Let me preface this explanation by first saying that angular directives are simply HTML attributes. The difference between angular directives and standard W3C attributes is that angular directives are processed by the angular framework and the standard html attributes are processed by the browser. Angular directives native to angular will start with ng-, however it is possible to make your own custom directives that may not adhere to this convention.
In the code above, we told the angular framework that we have set up an angular app (module) called “MyAngularApp” using the ng-app directive, as well as a controller named “MainCtrl” (which has also been added to our app module) using the ng-controller directive. Now, anything between our opening and closing html elements will have access to the “MainCtrl” controller in the “MyAngularApp” module. If you only wanted angular to be accessible to a smaller range of html elements, you would apply the ng-app directive to top most parent element that you wanted to use angular in, such as the body tag or even a div tag within the body. For our example, we’ll use angular on our entire page.
Because we’ve specified <pre>ng-controller=”MainCtrl”</pre> on our html element, we will only be using one controller in this example. This will be suitable for simple scenarios, but ideally for medium to large sized projects, you would want to create multiple controllers to handle different parts of your UI. Using multiple controllers requires introducing the concept of angular routing, which I’m not going to talk about right now.
Demonstrating Two Way Data Binding
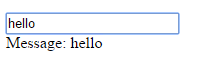
What exactly is two way data binding? As we add properties to the $scope object within our controller, we can access those properties from our UI. Two way binding just means that when properties in the model ($scope) get updated, so does the UI. When UI elements get updated, the changes get propagated back to the model ($scope). Let me give an example. Add the following html to the body of your page.
<input type="text" ng-model="message" />
<div>Message: </div>
There are a few things to talk about here. First, we see a new directive, ng-model. The value of this directive, message, is the property on our $scope that this UI element binds to. But wait, we haven’t initialized a $scope.message property in our controller. While we could have initialized the property, if the property doesn’t currently exist on our controller, it’ll be created automatically for us.
Second, we see some funky looking brackets with our scope variable in them. Angular uses mustache syntax to evaluate it’s expressions. In this case, the expression evaluates to the value of our $scope.message property. Our $scope.message property gets updated through binding when we update our text box (because of the ng-model directive). In turn, when the property is updated, it is then immediately updated on the UI. Cool, huh?
That’s the basics of setting up a project and a quick introduction to some of the angular directives. Some common ones that I tend to use a lot are ng-hide, ng-show, ng-if, ng-repeat, ng-click, ng-include, and ng-class to name a few. I encourage starting with these. You would be surprised what you can do with just a few directives.
If you’re interested in learning how to do some more cool stuff with angular, I recommend learning how to perform ajax requests in order to interact with external applications/api’s.