Connecting to a Cisco IPSec VPN on Mac OSX with a PCF File
When connecting to a Cisco VPN on Windows, we typically take the route of using third party VPN software such as the Cisco VPN client or Shrew Soft. Each of these products allow you to specify a .pcf file, which contains the VPN information, in order to connect. When trying to accomplish the same goal on Mac OSX, the process isn’t as straight forward, however, it also doesn’t require a third party client.
In order to connect to a VPN from a Mac, you will need the following information.
- VPN host address
- VPN group name
- VPN group’s password
- User name and password for your account on the VPN.
If you have a .pcf file, the first three pieces of information can be found by opening the file in a text editor such as atom, sublime, or TextEdit. If you already have all four pieces of information, then you can skip this next part. Below is a small segment of the file.
Host=123.456.78.90
AuthType=1
GroupName=kerberos
GroupPwd=
enc_GroupPwd=595533KJL3KJ4L2K3J4LKJ2L...etc
You will need the Host, GroupName, and enc_GroupPwd values from this password. There may be a possibility that the password isn’t even encoded. If this is the case, the group password may be under the GroupPwd setting.
The enc_GroupPwd value is actually an encoded version of the real VPN group password, but don’t worry, it isn’t very hard to crack. There is a tool online that does this specific job.
Cisco VPNClient Password Decoder
Paste the encoded group password from your .pcf file into that tool and you should see the decrypted version.
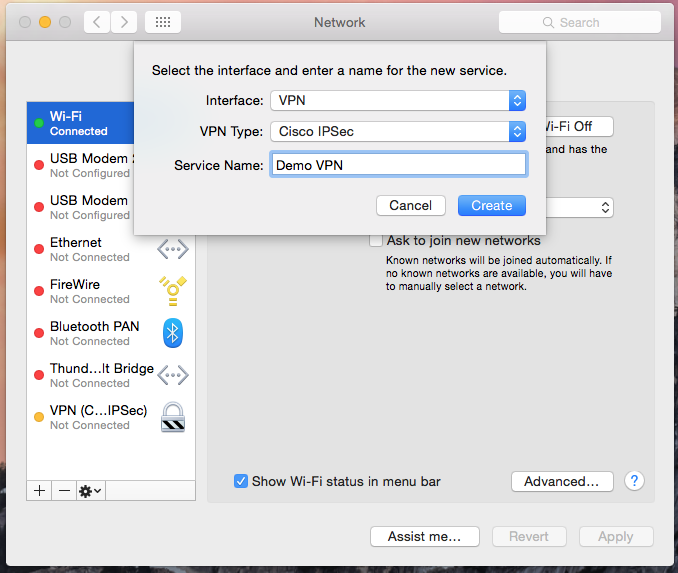
Now that we have all of this information, go to System Preferences > Network > and click the + sign in the bottom left hand corner to create a new service. Select VPN as the interface type, followed by Cisco IPSec as the VPN type. Service Name is an arbitrary value that is only used as a label for the service.
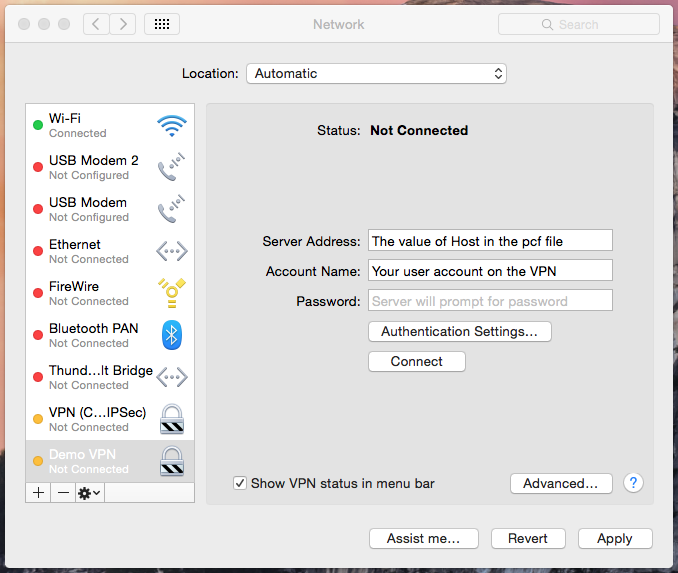
After selecting Create, you are ready to start filling in the details. The Server Address is the host value that we extracted from the .pcf file earlier. The account name is your account on the network that you are trying to connect to. For example, if account was somedomain\bclapp, then I would fill in bclapp into this input. Password is optional. If you don’t fill it out, the server will prompt you upon trying to connect every time.
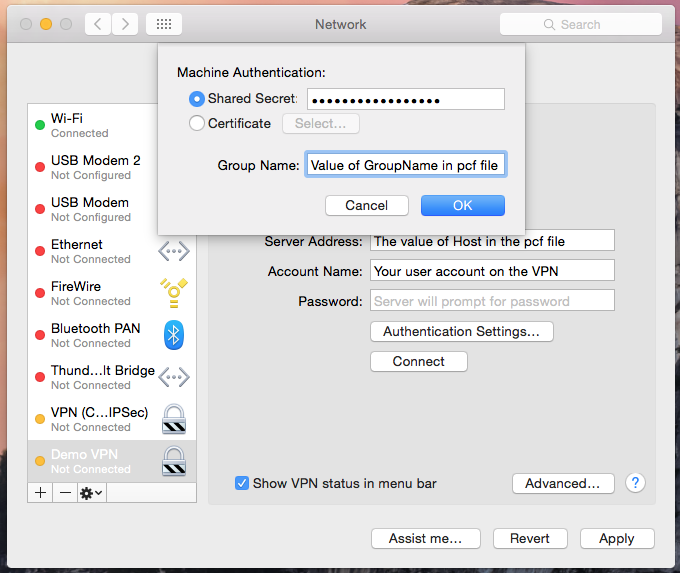
Next, select Authentication Settings. Under Machine Authentication, select Shared Secret and put the decrypted group password into this input. Inside of the group name input, put the group name from the .pcf file. Finally, select OK and attempt to connect.